Thursday, April 21, 2011

Easter Crafties!!

There are so many blogs out there with AWESOME Easter crafts on them that i want to try, so stay tuned i am going to attempt at least on this weekend, and I will be chronicling our Easter egg dying eggstravaganza (see what i did there, im so good). In this post the munchkins and I are doing a craft that they actually do in school and I have been wanting to do with them at home for a while, and it lends itself nicely to Easter. IDK what you technically call it but for the purpose of this post we will go with...

Tye Dyed Coffee Filters

What you need:

1. Coffee Filters
2. Markers
3. Spray bottle

We made flowers and butterflies with ours, however the possibilities are endless, but we just used pipe cleaners to hold everything together, so you can adjust that depending on what you plan on doing with them in the end.


First, you get a super cute little guy to color your coffee filters! :) You can do designs, patterns, solid colors, blocks of color, the choices are endless! Its a great on for the kids too because it really dosen't matter what the coloring looks like because you are going to spray it later so that it all runs together,so let them go wild!


Next you get a cute little girl to spray the colored coffee filters! :) This part it also good for the littles but needs a bit of supervision, you have to get the filters wet enough to make the colors run just a bit but not so wet that they all pool in the middle it took us about 4 good sprays!

Then just let them dry in the front yard!! LOL


When they dry you are left with circles of fun!! :) You can do what you will with them, like i said before we maid butterflies and flowers for family for Easter, just for funsies! Its super cheap and lots of fun for the littles because they can do it basically all on their own!! Hope you try it and have as much fun as we did! Let me know how your turn out!! :)


Ashley

Thursday, April 14, 2011

I love this sale!!!

Restaurant.com is having their popular 80% off sale again!

This means you can get a $25 Restaurant.com Gift Certificate for as little as $2 with promo code STEAK.

This is a good way to save on you restaurant bill. Also, if you are planning a vacation in the next few months, you may want to look at what restaurants are participating in the area where you’ll be vacationing to save on your vacation costs.

You can see all the gift certificates available here.

Tuesday, April 12, 2011

Shaving Cream Painted Easter Egg Cards

I found this awesome project over at Little Wonders' Days !!!!

I can't believe we have never tried shaving cream painting! This was so much fun and the results were really amazing. I wasn't sure how messy of a project it would be, so Little J did it first. It really wasn't much mess at all, so Sassyfras and Juiciness will do it later too.
We've pulled out some of our Easter books to go along with this craft. Sassyfras and Juiciness still love Minerva Louise and the Colorful Eggs by Janet Morgan Stoeke and Peter Rabbit's Easter. I think this will be the year that Little J and I read the Easter story from the Bible. Until now, we've read children's versions of the story.
You will need:
A tray of some sorts
Shaving cream
Cardstock or construction paper
Acrylic paints
Squeegee
A toothpick, paintbrush, or spoon (something to swirl the paint)
Squirt enough shaving cream on the tray to cover the surface. Spread it around to make the surface relatively even, it won't be smooth.

Once you have your shaving cream on the tray, squirt some acrylic paint onto it.
Then using a toothpick, paintbrush, spoon, or something similar, zigzag gently though the paint to give it a marbled effect.
Using cardstock, I cut out egg shapes for Little J to paint. We also tried a few pieces of construction paper that worked just fine too.
Press your paper into the paint/shaving cream and let it sit for a few seconds.
Remove the paper by lifting it straight up. Let the paint/shaving cream sit on the paper for a couple of minutes before squeegeeing it off the paper.
Gently and smoothly squeegee the shaving cream off the paper. It will remove the shaving cream, but not the paint.

Once these eggs dried, Little J wrote notes to his grandparents and a couple of cousins. I have pictures of the kids that we are going to attach and then send them as our Easter cards.

Thursday, April 7, 2011

Resurrection Eggs Tutorial

Resurrection Eggs by SweeterThanSweets

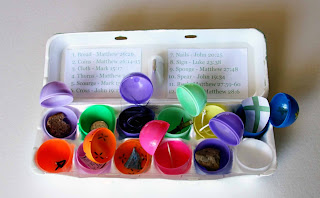
We all know that Easter isn't just about eggs, bunnies and baskets... but it can be hard to teach our children the true story of Easter in a way that they can grasp. This year, I decided to make my own "Resurrection Eggs" to teach Little Sweets the story of Jesus' death and resurrection. You can buy these at Christian book stores or online but they're pretty simple to make yourself! This project is so easy and cheap... most, if not all, of the items are things you already have around your house.


What you need to make your own Resurrection Eggs*:

Supplies for Resurrection Eggs by SweeterThanSweets

egg carton
12 plastic eggs
list of items and Bible verses
piece of bread
coin(s)
piece of purple cloth or ribbon
thorns from a rose stem
piece of string or rope to represent scourge or whip
cross
nail(s)
sign that says "This is the King of the Jews"
spear or sword (or piece of toothpick)
rock

Total cost: $1.00
Everything but the eggs should be laying around your house somewhere!

*Please note that these are ALL choking hazards for young children. This is meant to be used as a teaching tool not a toy for young children.

First, you'll want to write or print up a list of the items and corresponding Bible verses. Each item represents something that occurred during the week of Jesus' crucifixion and resurrection. (You can download and print my list here if you'd rather not do it yourself. Mine also includes a sign and a cross.) Tape the list to the inside of your egg carton. You might want to paint the outside of your egg carton so your Little Sweeties don't think that the true story of Easter has anything to do with a certain brand of eggs. =)

Inside Resurrection Egg Carton by SweeterThanSweets

Then, put one item inside each egg, leaving the last one empty.

Opened Resurrection Eggs by SweeterThanSweets

To teach your children the true story of Easter, you'll open each egg and read the corresponding Bible verse. (Verses below are all from the New International Version of the Bible.) You could open up one egg per day in the 12 days leading up to Easter, like an advent calendar. Or you could open them all on Good Friday to give the kids time to process the story before Easter Sunday.

Bread for Resurrection Eggs by SweeterThanSweets
1. Bread
Matthew 26:26
While they were eating, Jesus took bread, and when he had given thanks, he broke it and gave it to his disciples, saying, “Take and eat; this is my body.”


2. Coins
Matthew 26:14-15
Then one of the Twelve—the one called Judas Iscariot—went to the chief priests and asked, “What are you willing to give me if I deliver him over to you?” So they counted out for him thirty pieces of silver.

Cloth for Resurrection Eggs by SweeterThanSweets
3. Purple Cloth
Mark 15:17
They put a purple robe on him, then twisted together a crown of thorns and set it on him.

Thorn for Resurrection Eggs by SweeterThanSweets
4. Thorns
Matthew 27:29
...and then twisted together a crown of thorns and set it on his head. They put a staff in his right hand. Then they knelt in front of him and mocked him. “Hail, king of the Jews!” they said.

5. Scourge
Mark 15:15
Wanting to satisfy the crowd, Pilate released Barabbas to them. He had Jesus flogged, and handed him over to be crucified.

6. Cross
John 19:17-18
Carrying his own cross, he went out to the place of the Skull (which in Aramaic is called Golgotha). There they crucified him, and with him two others—one on each side and Jesus in the middle.

Nails for Resurrection Eggs by SweeterThanSweets
7. Nails
John 20:25
So the other disciples told [Thomas], “We have seen the Lord!” But he said to them, “Unless I see the nail marks in his hands and put my finger where the nails were, and put my hand into his side, I will not believe.”

8. Sign
Luke 23:38
There was a written notice above him, which read: THIS IS THE KING OF THE JEWS.

9. Sponge
Matthew 27:48
Immediately one of them ran and got a sponge. He filled it with wine vinegar, put it on a staff, and offered it to Jesus to drink.

10. Spear/Sword
John 19:34
Instead, one of the soldiers pierced Jesus’ side with a spear, bringing a sudden flow of blood and water.

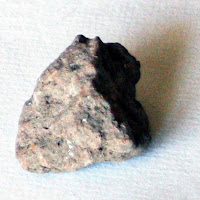
Rock for Resurrection Eggs by SweeterThanSweets
11. Rock
Matthew 27:59-60
Joseph took the body, wrapped it in a clean linen cloth, and placed it in his own new tomb that he had cut out of the rock. He rolled a big stone in front of the entrance to the tomb and went away.

12. (Nothing)
Matthew 28:6
He is not here; he has risen, just as he said.


That last one is my favorite... nothing tells the true story of Easter better than the Empty Tomb:

Empty Tomb by Kruse Kronicle
Image: KruseKronicle